Florist Pricing Calculator by Redroc Creative

Putting your calculator on your website

Copy your code in step 6 of the builder, then follow the steps for your website builder.

Before you start

Which website builder is your site on?
  1. Open the page couples should see it on and click Edit.
  2. Click an insert point (or Add Block) where it should go, and choose Code.
  3. In the code block, make sure it is set to HTML, then paste.
  4. Click away from the block, then Save. The calculator only draws on your live page, so open the page in a new tab to see it.

Code blocks with scripts need a Core, Plus or Advanced plan (Business or Commerce on older plans).

On an older 7.0 template, if it only appears after you refresh the page, ask Squarespace support to turn off Ajax loading for your template.

  1. In the Wix editor, click Add, then Elements, then Embed, then Embed code. On an older Wix site it is Add Elements, then Embed Code, then Embed HTML.
    The Wix editor with the Add Elements panel open on Embed. The first choice is Embed code, Display content using HTML code.
    Add, then Elements, then Embed, then Embed code.
  2. Open the box's settings (the gear above the page, or Enter Code on an older site). Replace the example code with yours, then click Apply (Update on an older site).
    An empty HTML box on the Wix page, with its Settings panel open on the right. The calculator code is pasted into Enter HTML embed code, with the Apply button below it.
    Paste into the code box, then click Apply.
  3. Drag the box's bottom edge down until the whole calculator shows, down to its buttons. Wix cuts off anything below the edge without a scroll bar. If the box hangs past its section, drag the section taller too. Do the same in the mobile view.
    The calculator showing inside its HTML box on the Wix page, with the pointer on the handle at the middle of the box's bottom edge.
    Drag the handle at the bottom middle of the box.
    The Wix editor in mobile view, with the phone icon selected at the top right. The calculator's Send, Save or print and Book a consultation buttons all show, and the box's bottom edge sits below them.
    In the mobile view, the box's bottom edge sits below the last line.
  4. Publish, then check the live page.
    A published Wix page with the calculator showing in full below the site's footer: the item list with quantities on the left, and the estimate, notes box and Send button on the right.
    The calculator on a published Wix page.

Wix keeps embedded code in its own little window, so the calculator cannot borrow your site's fonts. In step 4 of the builder, type your font names instead of ticking "use my website's fonts".

Wix may block printing inside that window. Couples can still email their list or copy it.

  1. Open the page in Showit and add a new canvas where the calculator should go.
  2. Click Add, then Embed Code, and paste into the code box.
  3. Make the embed box as wide as the canvas and tall enough for the whole calculator, on both the desktop and the mobile view.
  4. Publish, then check the live page.

Showit shows embedded code only on the published site, not in the editor.

  1. Edit the page in the block editor.
    The WordPress block editor on a page titled Wedding flowers. Below the title it says Type / to choose a block, and the Publish button is at the top right.
    The block editor, with your page open.
  2. Add a Custom HTML block where the calculator should go (type /html to find it).
    On a new line of the page, /html has been typed, and a small menu below it offers one choice, Custom HTML.
    Type /html on a new line, then pick Custom HTML.
  3. Paste into the block (on newer WordPress, click Edit HTML first, paste, then click Update). Then click Publish, or Save if the page is already live (Update on older WordPress).
    The Custom HTML window in WordPress. The calculator code is pasted into the HTML tab on the left, a preview of the calculator shows on the right, and the Update button is at the bottom right.
    Paste into the code box, then click Update.
  4. Open the live page to check it.
    A published WordPress page titled Wedding flowers, with the calculator below the title: Larkspur and Fern, then the Personal flowers and Ceremony items with their quantities and prices.
    The calculator on a published WordPress page.

Use a Custom HTML block, not a Paragraph or the old Classic editor, which can break the code.

On WordPress.com, scripts only run on plans that allow plugins. On your own WordPress, you need to be an Administrator.

Using Elementor? Drag in an HTML widget and paste there.

  1. In Shopify, go to Online Store, then click Edit theme (on some stores it is Themes, then Customize).
    The Shopify admin with Online Store chosen in the left menu. The store's current theme, Horizon, shows with an Edit theme button at its bottom right, under the pointer.
    Online Store, then Edit theme.
  2. Open the page the calculator belongs on, click Add section, and choose Custom Liquid.
    The Shopify theme editor on the Home page. Add section is open under Template, custom liquid is typed in its search box, and the pointer is on the one result, Custom Liquid.
    Add section, then Custom Liquid. Typing its name finds it quickly.
  3. Paste into the Liquid code box and click Save.
    The Custom Liquid settings on the left, with the calculator code pasted into the Liquid code box. The page preview on the right already shows the calculator, and the pointer is on the Save button at the top right.
    Paste into Liquid code, then click Save at the top right.
  4. Open the live page to check it.
    A live Shopify store page with the calculator below the store's products: the item list with quantities on the left, and the estimate on the right.
    The calculator on a live Shopify page.

Shopify takes up to 50 KB in one Custom Liquid box. Step 6 of the builder shows the size of your code.

  1. Look for a block or element called Code, Embed, Custom HTML or HTML in your website builder.
  2. Paste the whole code into it and save.
  3. Open the live page to check it.

The code needs to run scripts. If your website builder strips them out, the box will stay empty.

Check it on your live page

Do this after you first paste it, and again after every change.

  1. Open the page on your phone and on a computer.
  2. Change a number. The estimate should change straight away.
  3. Press the email button. Your email app should open with the list filled in and addressed to you. Send one to yourself.
  4. If you turned on the automatic form, send one with your own name. It should reach your inbox within a few minutes. Check your spam folder the first time.
  5. Press Save or print and look over the sheet.
  6. Check the calculator's fonts match your site. If they don't, go back to step 4, untick "Use my website's own fonts" and type your font names.

Changing your prices later

  1. On your website, open the code box where you pasted your calculator and copy everything in it.
  2. Open the builder from your purchase email and paste that code into "Change the one on your website". All your settings come back.
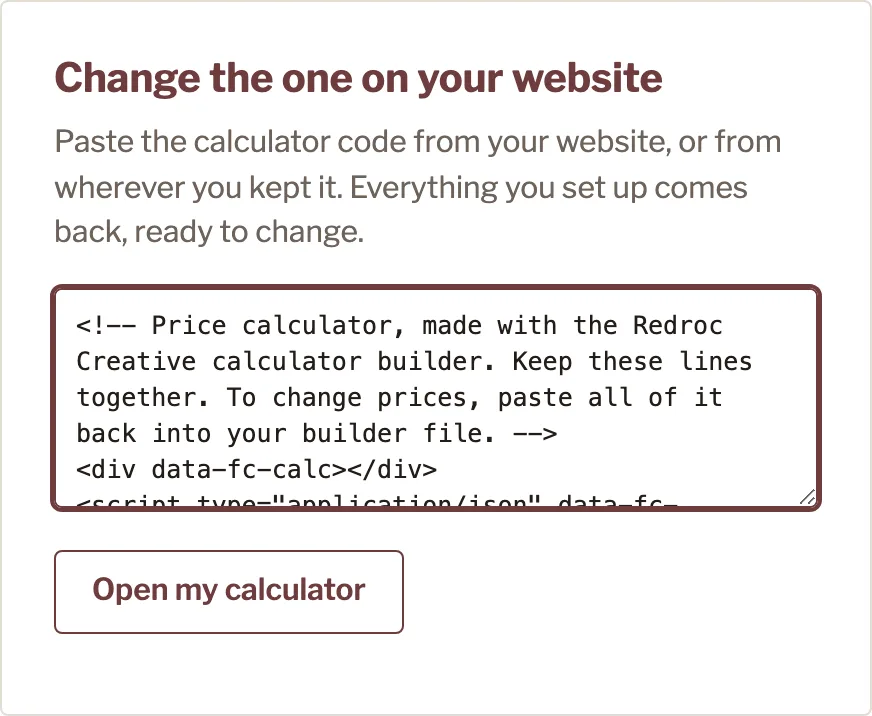
    The builder's first screen. Under the heading Change the one on your website, a box holds the pasted calculator code, with the Open my calculator button below it.
    Paste it here, then click Open my calculator.
  3. Make your changes. In step 6, copy the new code and paste it over the old code on your website.

    Step 6 of the builder, Put it on your website. After clicking Copy my code, it says Copied. Now paste it into your website.
    Step 6 tells you when your new code is copied.

Your calculator never changes by itself. It stays exactly as you pasted it until you paste a new one.

Email the code to yourself after every change. With that email and the builder, you can always pick up where you left off, even on a new computer.

If something looks wrong

The box is empty on your live page.
Your plan may not allow scripts, or the code went into a text block instead of a code block. On Squarespace, check the code block is set to HTML.
It shows on your live page but not in the editor.
That is normal on Squarespace and Showit. They only run the code on the published page.
The fonts do not match your website.
In step 4, type your font names exactly as your website builder lists them, or tick "use my website's own fonts" (not on Wix).
On Wix the calculator is cut off, or there is empty space under it.
Drag the box taller or shorter until it fits, in the desktop view and again in the mobile view.
Shopify will not save the code.
It is over Shopify's 50 KB limit. Remove some descriptions or photo links in step 2, then copy your code again.
The automatic form says it did not send.
Check your key in step 5 and press Send me a test. On the free plan, Web3Forms stops after 250 lists in a month. If your website is on a free Wix or similar address, Web3Forms may need to approve it, so reply to their email.
Save or print does nothing on Wix.
Wix blocks printing inside embedded code. Couples can still email their list or copy it.

Still stuck?

Email me at brian@redroccreative.com and tell me which website builder you use. I read every one.